
CS149 2023fall assignment记录
课程主页:https://gfxcourses.stanford.edu/cs149/fall23/
视频我是在 b 站看的 2018 年的,作业写的是 2023 年的,实测这几年的 assignment 都没有什么变化
Assignment 1: Performance Analysis on a Quad-Core CPU
Environment Setup
我是用的 m1 pro Mac ,8 核 CPU,8 个线程
Program 1:Parallel Fractal Generation Using Threads
需要在 workerTreadStart中调用mandelbrotSerial函数,至于具体如何将任务分配给每一个线程,这是这个 program 希望我们能自己探索的
int id = args->threadId;
int totalRows = args->height / args->numThreads;
if (args->height % args->numThreads != 0)
{
  totalRows++;
}
int startRow = id * totalRows;
if (startRow >= args->height)
{
  return;
}
if (startRow + totalRows > args->height)
{
  totalRows = args->height - startRow;
}
mandelbrotSerial(args->x0, args->y0, args->x1, args->y1, args->width, args->height, startRow, totalRows, args->maxIterations, args->output);
一开始自然而然地想到按照分块进行划分,即每个线程按照图片从上到下,各自负责一段区域的计算,最后算出来的加速比与线程数量关系如下图

可以看到在线程数为 3 的时候,加速比竟然比线程数为 2 时还要小,原因是 3 个线程任务分配不均衡,View1 图像计算任务大部分集中在中间区域,所以 Thread1 相比其他 2 个线程计算量更大,最后可能其他两个线程早都执行完了还需要等待 Thread1 的完成
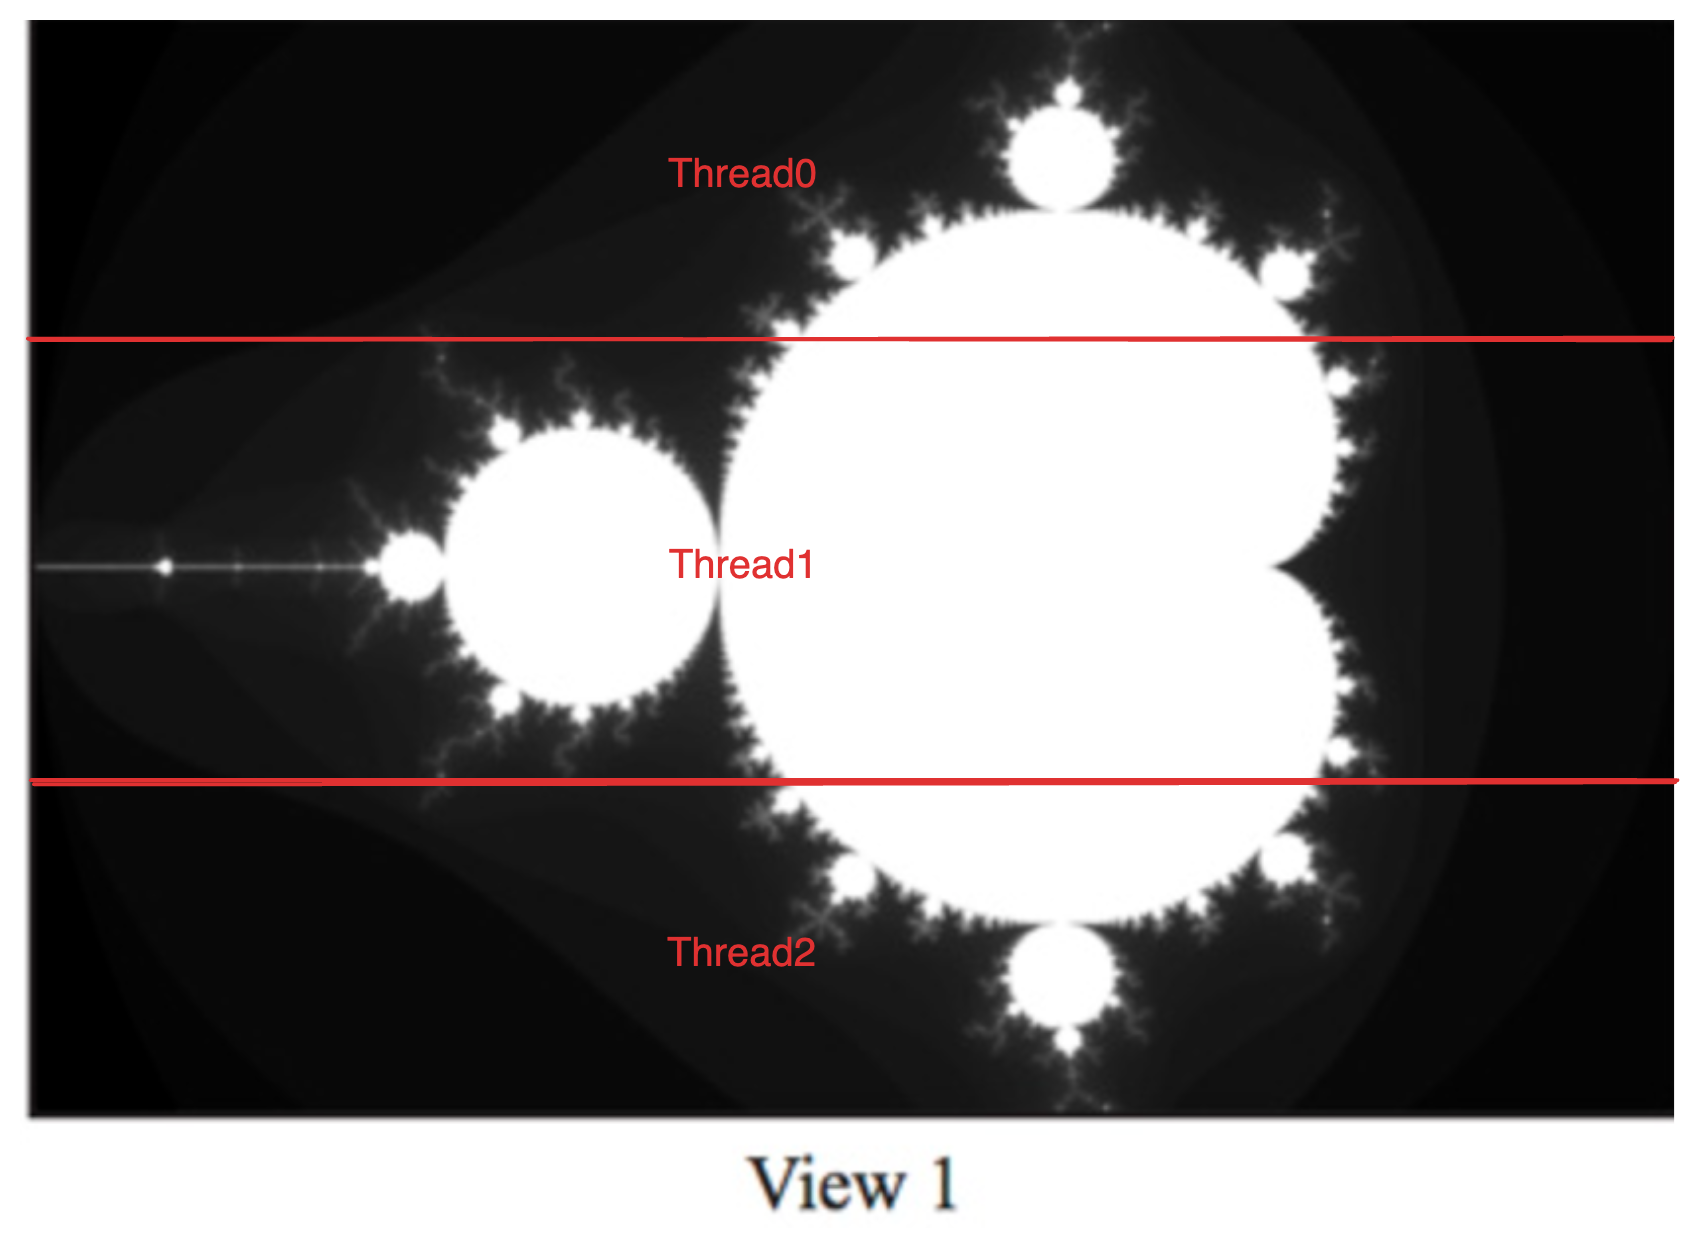
Thread 2 time: 83.439 ms
Thread 0 time: 83.503 ms
Thread 1 time: 255.239 ms
为了让每个线程的计算量接近,那么就不能根据图像本身进行划分,可以以更小的细粒度,比如每个线程依次对每个像素进行运算,修改mandelbrotSerial的代码为
void mandelbrotSerial2(
    float x0, float y0, float x1, float y1,
    int width, int height,
    int startIdx, int numThreads,
    int maxIterations,
    int output[])
{
  float dx = (x1 - x0) / width;
  float dy = (y1 - y0) / height;

  for (int idx = startIdx; idx < width * height; idx += numThreads)
  {
    int i = idx % width;
    int j = idx / width;
    float x = x0 + i * dx;
    float y = y0 + j * dy;

    output[idx] = mandel(x, y, maxIterations);
  }
}
然后在workerThreadStart中调用
mandelbrotSerial2(args->x0, args->y0, args->x1, args->y1, args->width, args->height, args->threadId, args->numThreads, args->maxIterations, args->output);
改进后的加速比为
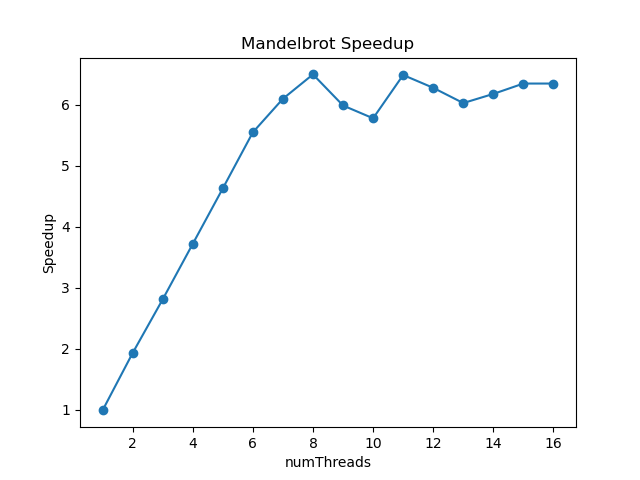
可以看出在线程数为 8 之前,加速比上升得非常均匀,8 之后是因为 CPU 只支持 8 线程并行,所以加速比不升反降
作图的 python 程序为
import subprocess
import re
import matplotlib.pyplot as plt

# 不同的numThreads值
numThreads_values = list(range(1, 17))  # 根据需要修改

# 存储加速比的列表
speedup_values = []

# 调用命令行程序,并获取输出
for numThreads in numThreads_values:
    command = f"./mandelbrot -t {numThreads}"
    output = subprocess.check_output(command, shell=True, encoding='utf-8')

    # 从输出中提取加速比
    match = re.search(r"\(([\d.]+)x speedup", output)
    if match:
        speedup = float(match.group(1))
        speedup_values.append(speedup)
    else:
        speedup_values.append(1.0)  # 如果无法提取加速比,则默认为1.0

# 绘制折线图
plt.plot(numThreads_values, speedup_values, marker='o')

# 添加图表标题和轴标签
plt.title('Mandelbrot Speedup')
plt.xlabel('numThreads')
plt.ylabel('Speedup')

# 显示图表
plt.show()
Program 2:Vectorizing Code Using SIMD Intrinsics
program2 只需学习给出的样例程序,然后依葫芦画瓢即可
void clampedExpVector(float *values, int *exponents, float *output, int N)
{
  __cs149_vec_float x;
  __cs149_vec_int y;
  __cs149_vec_float result;
  __cs149_vec_int allOneInt = _cs149_vset_int(1);
  __cs149_vec_int zeroInt = _cs149_vset_int(0);
  __cs149_vec_float maxVal = _cs149_vset_float(9.999999f);
  __cs149_mask maskAll, maskIsNotZero, maskIsZero;

  for (int i = 0; i < N; i += VECTOR_WIDTH)
  {
    if (i + VECTOR_WIDTH > N)
    {
      maskAll = _cs149_init_ones(N - i);
    }
    else
    {
      maskAll = _cs149_init_ones();
    }
    maskIsZero = _cs149_init_ones(0);

    _cs149_vload_float(x, values + i, maskAll); // x = values[i];
    _cs149_vmove_float(result, x, maskAll);
    _cs149_vload_int(y, exponents + i, maskAll); // y = exponents[i];

    _cs149_veq_int(maskIsZero, y, zeroInt, maskAll); // if (y == 0) {
    _cs149_vset_float(result, 1.f, maskIsZero);      //   output[i] = 1.f;

    maskIsNotZero = _cs149_mask_not(maskIsZero); // } else {

    while (1)
    {
      _cs149_vsub_int(y, y, allOneInt, maskIsNotZero); // count = y - 1

      _cs149_vgt_int(maskIsNotZero, y, zeroInt, maskIsNotZero); // if (count > 0) {
      int num = _cs149_cntbits(maskIsNotZero);
      if (num == 0)
      {
        break;
      }
      _cs149_vmult_float(result, result, x, maskIsNotZero); //   resulte *= x;
    }

    maskIsZero = _cs149_init_ones(0);
    _cs149_vgt_float(maskIsZero, result, maxVal, maskAll); // if (result > 9.999999f) {
    _cs149_vset_float(result, 9.999999f, maskIsZero);      //   result = 9.999999f;

    _cs149_vstore_float(output + i, result, maskAll);
  }
}
Program 3 Parallel Fractal Generation Using ISPC
Part 1
根据作业 github 界面上的提示,由于我用的 m 芯片 mac,将 Makefile 中 ISPC 的 flag 改为ISPCFLAGS=-O3 --target=neon-i32x8 --arch=aarch64 --opt=disable-fma --pic
[mandelbrot serial]:            [208.261] ms
Wrote image file mandelbrot-serial.ppm
[mandelbrot ispc]:              [58.091] ms
Wrote image file mandelbrot-ispc.ppm
                                (3.59x speedup from ISPC)
Part 2
task数目为 2
[mandelbrot serial]:            [213.240] ms
Wrote image file mandelbrot-serial.ppm
[mandelbrot ispc]:              [58.859] ms
Wrote image file mandelbrot-ispc.ppm
[mandelbrot multicore ispc]:    [29.746] ms
Wrote image file mandelbrot-task-ispc.ppm
                                (3.62x speedup from ISPC)
                                (7.17x speedup from task ISPC)
task数目为 8 时
[mandelbrot serial]:            [208.007] ms
Wrote image file mandelbrot-serial.ppm
[mandelbrot ispc]:              [57.842] ms
Wrote image file mandelbrot-ispc.ppm
[mandelbrot multicore ispc]:    [14.501] ms
Wrote image file mandelbrot-task-ispc.ppm
                                (3.60x speedup from ISPC)
                                (14.34x speedup from task ISPC)
task数目为 18 时
[mandelbrot serial]:            [208.110] ms
Wrote image file mandelbrot-serial.ppm
[mandelbrot ispc]:              [57.966] ms
Wrote image file mandelbrot-ispc.ppm
[mandelbrot multicore ispc]:    [11.256] ms
Wrote image file mandelbrot-task-ispc.ppm
                                (3.59x speedup from ISPC)
                                (18.49x speedup from task ISPC)
为什么 task 超过了 8 个核心数,加速比还能继续提高呢?在课件里有一段讨论,里面引用了 ispc 文档里的话
In general, one should launch many more tasks than there are processors in the system to ensure good load-balancing, but not so many that the overhead of scheduling and running tasks dominates the computation
这样做的目的是为了不同线程尽可能负载均衡,和 Program1 中的优化类似。比如有 4 个核心,分配了 4 个 task,执行时间分别为 1ms、2ms、10ms、1ms,那么总时间由于木桶效应就约为 10ms,而如果我们分配 8 个 task,那么每个 task 执行的计算量相比 4 个 task 是减少的,就算可能分配不均,“木桶”中的短板与长板的差距也会缩小,最后反映到执行的总时间会减少。当然task 数目也不是越多越好,这是一个 tradeoff,如果 task 间切换的开销大于负载均衡的优化,那么就不应该继续增加 task 的数目了
Program 4 和 5 感觉没啥好写的,直接跳过。Program 6 要从斯坦福服务器获取数据集也懒得写了
Assignment 2:Building A Task Execution Library from the Ground Up
Part A
做这个 assignment 之前一定要好好看一些 readme,把整个项目的文件结构搞清楚再开始动手。readme 中贴心的给出了 what you need to do,实现的难度循序渐进
step 1
Step 1主要考察多线程的使用,只需将 tasks 尽可能平均分配给每一个线程即可
int tasks_per_thread = (num_total_tasks + num_threads_ - 1) / num_threads_;
for (int i = 0; i < num_threads_; i++)
{
  int start = i * tasks_per_thread;
  int end = std::min((i + 1) * tasks_per_thread, num_total_tasks);
  threads_[i] = std::thread([runnable, start, end, num_total_tasks]()
                            {
                              for (int j = start; j < end; j++)
                              {
                                runnable->runTask(j, num_total_tasks);
                              } });
}
for (int i = 0; i < num_threads_; i++)
{
  threads_[i].join();
}
step 2 step 3
step 2 和 3 我合在一起写了,step 2 要求用线程池 ,step 3 要求用条件变量。使用线程池的好处是减少线程创建销毁带来的开销,每个线程在完成任务之后并不退出,而是循环地检查任务池是否有新的任务,如果没有则利用条件变量 sleep 释放资源,直到任务池有新增任务唤醒了休眠的线程,线程才会执行
有一个需要思考的问题是,使用线程池之后主线程怎么知道任务什么时候完成呢?在 step 1 中,可以使用 thread.join()函数等待所有线程退出,但在线程池中,线程一直处于循环,该方法就失效了。解决办法也是使用条件变量,每新增一个任务 cnt 就加 1,每完成一个任务 cnt 减 1,减到 0 后线程池就唤醒主线程的条件变量
线程池实现
class ThreadPool
{
public:
    ThreadPool(size_t numThreads) : taskCount(0), stop(false)
    {
        for (size_t i = 0; i < numThreads; ++i)
        {
            threads.emplace_back([this]
                                 {
                while (true) {
                    std::function<void()> task;

                    {
                        std::unique_lock<std::mutex> lock(mutex);
                        condition.wait(lock, [this] { return stop || !tasks.empty(); });
                        if (stop ) // 线程池即将销毁
                            return;
                        task = std::move(tasks.front());
                        tasks.pop();
                    }

                    task();

                     {
                        std::unique_lock<std::mutex> lock(mutexCount);
                        --taskCount;
                        if (taskCount == 0) {
                            conditionCount.notify_all();
                        }
                    }
                } });
        }
    }

    void waitAllTasks()
    {
        std::unique_lock<std::mutex> lock(mutexCount);
        conditionCount.wait(lock, [this]
                            { return taskCount == 0; });
    }

    template <typename Func, typename... Args>
    void enqueue(Func &&func, Args &&...args)
    {
        {
            std::unique_lock<std::mutex> lock(mutexCount);
            ++taskCount;
        }

        {
            std::unique_lock<std::mutex> lock(mutex);
            tasks.emplace([func, args...]
                          { func(args...); });
        }
        condition.notify_one();
    }

    ~ThreadPool()
    {
        {
            std::unique_lock<std::mutex> lock(mutex);
            stop = true;
        }
        condition.notify_all();
        for (std::thread &thread : threads)
            thread.join();
    }

private:
    std::vector<std::thread> threads;
    std::queue<std::function<void()>> tasks;

    std::mutex mutex;
    std::condition_variable condition;

    size_t taskCount;
    std::condition_variable conditionCount;
    std::mutex mutexCount;

    bool stop;
};
主线程
int tasks_per_thread = (num_total_tasks + num_threads_ - 1) / num_threads_;
    for (int i = 0; i < num_threads_; i++)
    {
        int start = i * tasks_per_thread;
        int end = std::min((i + 1) * tasks_per_thread, num_total_tasks);
        pool_->enqueue([runnable, start, end, num_total_tasks]()
                       {
            for (int j = start; j < end; j++)
            {
                runnable->runTask(j, num_total_tasks);
            } });
    }
    pool_->waitAllTasks();
Assignment 3:A Simple CUDA Renderer
这一个 assignment 学校本意是在云服务器上完成,所以给出的 Makefile 针对的平台都是 linux。我正好有台 win 本带 nvidia 1050 显卡,所以用了https://github.com/star-hengxing/cs149-xmake这个方案,用 xmake 构建项目
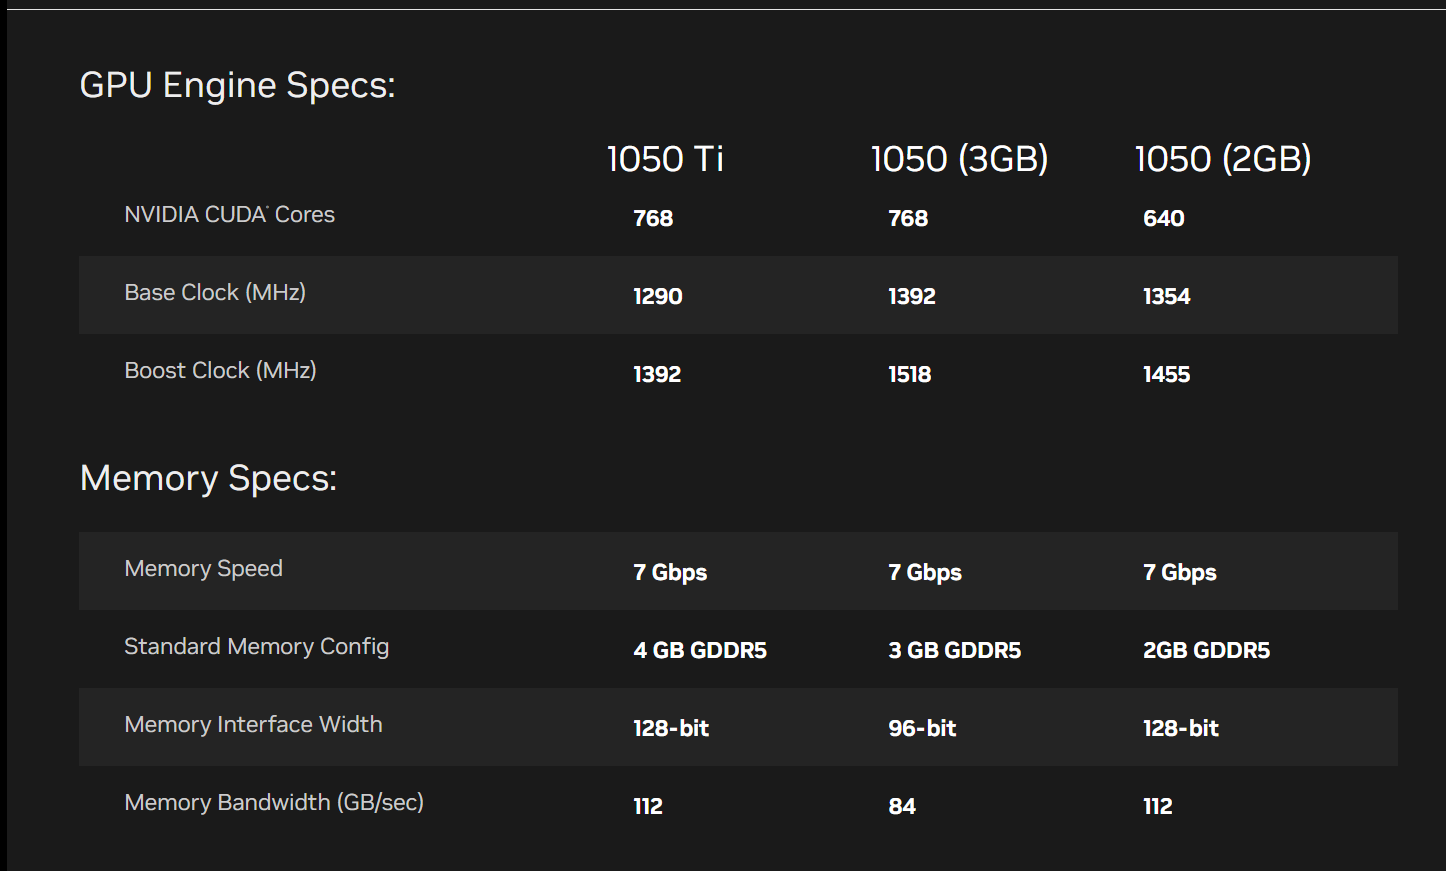
从英伟达官网可以查到自己显卡的技术参数,但我的显卡应该是 4g 缓存的 1050,这里没有列出,内存带宽经我测试应该为112 GB/s, 了解内存带宽对后续实验分析性能很有帮助
Part 1:CUDA Warm-Up 1: SAXPY
part1 主要是分析使用 cuda 带来的性能提升,我们可以计算 cuda kernel 的耗时从而计算出吞吐量,与理论值 112 GB/s 进行比较从而发现性能瓶颈是什么造成的
	double startTime = CycleTimer::currentSeconds();
    cudaMemcpy(device_x, xarray, N * sizeof(float), cudaMemcpyHostToDevice);
    cudaMemcpy(device_y, yarray, N * sizeof(float), cudaMemcpyHostToDevice);
    // run CUDA kernel. (notice the <<< >>> brackets indicating a CUDA
    // kernel launch) Execution on the GPU occurs here.
    saxpy_kernel<<<blocks, threadsPerBlock>>>(N, alpha, device_x, device_y, device_result);
    // cudaDeviceSynchronize();
    cudaMemcpy(resultarray, device_result, N * sizeof(float), cudaMemcpyDeviceToHost);
	// end timing after result has been copied back into host memory
    double endTime = CycleTimer::currentSeconds();
首先,我们把cudaMemcpy函数包裹在记时函数内,从而包括了 kernel 运行以及数据在 CPU 和 GPU 之间传输的总时间。下图可以看出吞吐量只有5.7 GB/s 左右
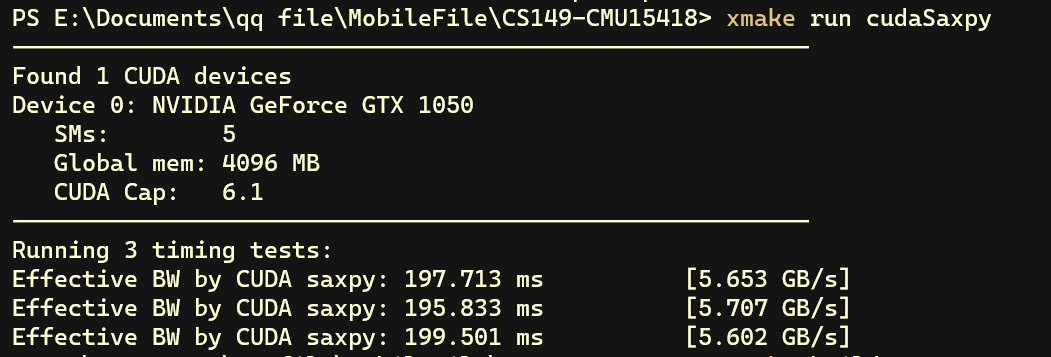 而 Assignment 1 中串行执行的版本吞吐量都有 20 GB/s,显然不太对劲

接着,我们只计算 cuda kernel 运算的时间,不考虑 CPU 和 GPU 之间搬运数据的耗时
    double startTime = CycleTimer::currentSeconds();
    // run CUDA kernel. (notice the <<< >>> brackets indicating a CUDA
    // kernel launch) Execution on the GPU occurs here.
    saxpy_kernel<<<blocks, threadsPerBlock>>>(N, alpha, device_x, device_y, device_result);
    cudaDeviceSynchronize();
    double endTime = CycleTimer::currentSeconds();
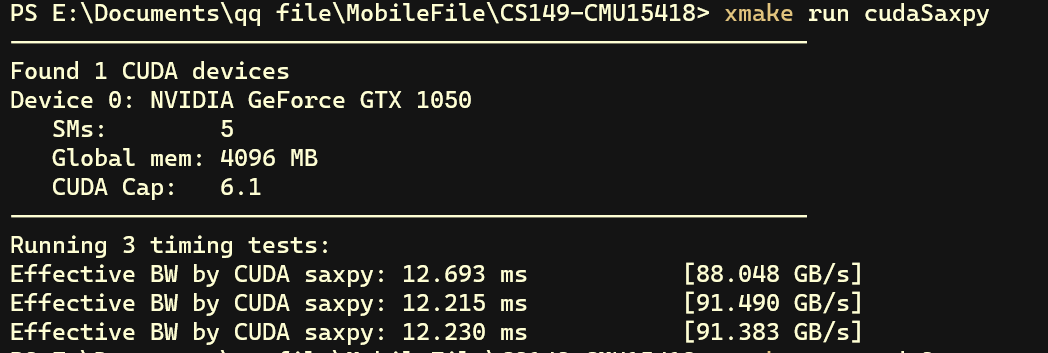
可以看出吞吐量大幅提升到了约 90 GB/s,超过了理论吞吐量的8成。通过以上两次测试可以发现运算的瓶颈来源于 CPU 和 GPU 之间的性能传输
Part 2: CUDA Warm-Up 2: Parallel Prefix-Sum
做这个 part 的时候遇到了一点小问题,windows 上无法使用 vscode 调试 cuda 程序,还好 WSL2 支持,关于 WSL2 安装 cuda 网上教程挺多,这里就不赘述了。之后的笔记没有说明都是在 WSL2 ubuntu 22.04 环境下完成,原因是后续有些包在 linux 系统上安装方便一些,而且项目中给的一些参考可执行文件只能在 linux 环境下运行
为了调试要修改一下对应的 xmake.lua 文件,在对应 target 下增加以下判断,-g 表示将CPU代码(host)编译成可调式版本,-G表示将GPU代码(kernel)编译成可调式版本,然后 xmake -m debug 将 xmake 模式设为 debug 模式
 if is_mode("debug") then
        add_cuflags("-G -g")
    end
接着 vscode 拓展里安装 Nsight Visual Studio Code Edition,配置 launch.json 文件,根据自己实际情况修改
{
    "version": "0.2.0",
    "configurations": [
        {
            "name": "CUDA C++: Launch",
            "type": "cuda-gdb",
            "request": "launch",
            "program": "${workspaceFolder}/build/linux/x86_64/debug/cudaScan.exe"
        },
    ]
}
assignment 主页已经给出了并行执行 scan 的 c 代码,我们所需做的只是将其中的 parallel_for 部分改为 cuda 的 kernel 函数
// c 代码
void exclusive_scan_iterative(int* start, int* end, int* output) {
    int N = end - start;
    memmove(output, start, N*sizeof(int));

    // upsweep phase
    for (int two_d = 1; two_d <= N/2; two_d*=2) {
        int two_dplus1 = 2*two_d;
        parallel_for (int i = 0; i < N; i += two_dplus1) {
            output[i+two_dplus1-1] += output[i+two_d-1];
        }
    }

    output[N-1] = 0;

    // downsweep phase
    for (int two_d = N/2; two_d >= 1; two_d /= 2) {
        int two_dplus1 = 2*two_d;
        parallel_for (int i = 0; i < N; i += two_dplus1) {
            int t = output[i+two_d-1];
            output[i+two_d-1] = output[i+two_dplus1-1];
            output[i+two_dplus1-1] += t;
        }
    }
}
__global__ void upsweep(int two_dplus1, int two_d, int N, int *output)
{
    int thread_id = blockIdx.x * blockDim.x + threadIdx.x;
    int i = thread_id * two_dplus1;
    if (i < N)
    {
        output[i + two_dplus1 - 1] += output[i + two_d - 1];
    }
}

__global__ void downsweep(int two_dplus1, int two_d, int N, int *output)
{
    int thread_id = blockIdx.x * blockDim.x + threadIdx.x;
    int i = thread_id * two_dplus1;
    if (i < N)
    {
        int t = output[i + two_d - 1];
        output[i + two_d - 1] = output[i + two_dplus1 - 1];
        output[i + two_dplus1 - 1] += t;
    }
}

__global__ void setElementToZero(int *output, int N, int idx)
{
    output[idx] = 0;
}

// 调用exclusive_scan时,调用处使用nextPow2使得N为2的幂次
void exclusive_scan(int *input, int N, int *result)
{

    int two_dplus1;
    int num;
    int blocks;

    for (int two_d = 1; two_d <= N / 2; two_d *= 2)
    {
        two_dplus1 = two_d * 2;
        num = (N + two_dplus1 - 1) / two_dplus1;
        blocks = (num + THREADS_PER_BLOCK - 1) / THREADS_PER_BLOCK;

        if(num<THREADS_PER_BLOCK) {
            upsweep<<<1, num>>>(two_dplus1, two_d, N, result);
        }else {
            upsweep<<<blocks, THREADS_PER_BLOCK>>>(two_dplus1, two_d, N, result);
        }
        cudaDeviceSynchronize();
    }

    setElementToZero<<<1, 1>>>(result, N, N - 1);
    cudaDeviceSynchronize();


    for (int two_d = N / 2; two_d >= 1; two_d /= 2)
    {
        two_dplus1 = two_d * 2;
        num = (N + two_dplus1 - 1) / two_dplus1;
        blocks = (num + THREADS_PER_BLOCK - 1) / THREADS_PER_BLOCK;

        if(num<THREADS_PER_BLOCK) {
                downsweep<<<1, num>>>(two_dplus1, two_d, N, result);

        }else {
            downsweep<<<blocks, THREADS_PER_BLOCK>>>(two_dplus1, two_d, N, result);

        }
        cudaDeviceSynchronize();
    }

    setElementToZero<<<1, 1>>>(result, N, 0);
}
要注意的是 exclusive_scan 并不是 kernel 函数,运行在 CPU 上,所以不能直接修改 result 数组的值,否则会报段错误。
至于 find_repeats函数,README 提示了要调用 exclusive_scan,但我一开始死活没想到前缀和和查找重复元素怎么联系在一起,看了其他博主的代码才发现exclusive_scan只是解决了 返回重复元素的个数 这个问题,至于把重复元素的下标放到一个数组里然后返回这个任务,则需要我们自己编写 kernel 函数
// 给重复的元素打记号
__global__ void find_repeat_flags(int N, int *device_input, int *flags,
                                  int *out_idxs)
{
    int index = blockIdx.x * blockDim.x + threadIdx.x;
    if (index < N - 1)
    { // Skip the last element.
        int flag_i = 0;
        if (device_input[index] == device_input[index + 1])
        {
            flag_i = 1;
        }
        flags[index] = flag_i;
        out_idxs[index] = flag_i;
    }
}

// 查找重复元素的下标并它们添加到输出数组
__global__ void find_repeat_elements(int N,
                                     int *flags,
                                     int *out_idxs,
                                     int *device_output)
{
    int index = blockIdx.x * blockDim.x + threadIdx.x;
    if (index < N - 1 && flags[index] == 1)
    { // Skip the last element.
        // out_idxs数组在经过exclusive_scan处理后,正好能够表示当前重复元素是第几个重复元素,从而能够将下标放到对应的位置上
        const int out_idx = out_idxs[index];
        device_output[out_idx] = index;
    }
}

// find_repeats --
//
// Given an array of integers `device_input`, returns an array of all
// indices `i` for which `device_input[i] == device_input[i+1]`.
//
// Returns the total number of pairs found
int find_repeats(int *device_input, int length, int *device_output)
{
    const int blocks = (length + THREADS_PER_BLOCK - 1) / THREADS_PER_BLOCK;
    const int N = nextPow2(length);

    int *flags = nullptr;
    int *out_idxs = nullptr;
    cudaMalloc((void **)&flags, N * sizeof(int));
    cudaMalloc((void **)&out_idxs, N * sizeof(int));
    find_repeat_flags<<<blocks, THREADS_PER_BLOCK>>>(length, device_input, flags,
                                                     out_idxs);
    cudaDeviceSynchronize();

    exclusive_scan(flags, N, out_idxs);
    cudaDeviceSynchronize();

    find_repeat_elements<<<blocks, THREADS_PER_BLOCK>>>(length,
                                                        flags, out_idxs,
                                                        device_output);
    int *num_ret = new int[1];
    cudaMemcpy(num_ret, out_idxs + length - 1, 1 * sizeof(int), cudaMemcpyDeviceToHost);
    const int ret = num_ret[0];
    delete[] num_ret;

    cudaDeviceSynchronize();

    cudaFree(flags);
    cudaFree(out_idxs);

    return ret;
}
Part 3: A Simple Circle Renderer
编译 render 目标的时候,显示找不到 glut.h头文件,使用
sudo apt install freeglut3-dev
安装对应包,随后修改 xmake.lua 文件即可 build 成功
target("render")
    set_kind("binary")
    add_files("render/*.cpp")
    add_files("render/*.cu")
    set_rundir("render")
    add_ldflags( "-lGL"," -lGLU"," -lglut")
target_end()
这个 part 的任务主要要满足两个性质。一个是原子性,还有一个是顺序性
原子性指的是对于每个像素的渲染,都会先取出原本的颜色,与圆圈的颜色进行叠加后,再写回到原来的内存。这个过程并没有原子性,所以对同一个像素的颜色渲染不应该并行执行
顺序性意思是,一个像素可能被几个圆圈覆盖,那么对这个像素颜色的渲染应该按照圆圈序号从小到大进行,否则最终结果会不一样
一开始的想法是,按像素进行并行。每个 thread 负责一个像素的渲染,每个 thread 函数会从小到大遍历圆圈,如果像素被这个圆圈覆盖,那么就调用 shadePixel 函数进行渲染。因为一个像素的渲染由一个 thread 负责,所以满足了原子性,不会出现其他 thread 更改自身的内存。又因为遍历圆圈的顺序是从小到大,所以顺序性也得到了保证。但是这种方法性能并不高,因为每个像素都要遍历所有的圆圈,最后使用 checker.py 进行打分只得到了十几分
之后看到了其他博主的求法。虽然也是一个 thread 负责一个像素的渲染,但很巧妙的是一个 block 中的 thread 使用了共享内存,这样 thread 之间可以共同配合完成圆圈的遍历,而不是每一个 thread 进行完整遍历。假设一个 block 有 512 个 thread,如果之前的方法需要遍历 n 次圆圈,这个方法只需要遍历 n/512 次,大大提升了性能
__global__ void kernelRenderPixelBlock()
{
    // total number of circles in the picture
    uint num_circles = cuConstRendererParams.numCircles;

    // global variable about image
    int img_width = cuConstRendererParams.imageWidth;
    int img_height = cuConstRendererParams.imageHeight;
    float inv_width = 1.f / img_width;
    float inv_height = 1.f / img_height;

    // thread information
    uint thread_id{threadIdx.y * blockDim.x + threadIdx.x};
    uint pixel_index_x{blockIdx.x * blockDim.x + threadIdx.x};
    uint pixel_index_y{blockIdx.y * blockDim.y + threadIdx.y};

    // assigned pixel information
    float4 *imgPtrGlobal = (float4 *)(&cuConstRendererParams.imageData[4 * (pixel_index_y * img_width + pixel_index_x)]);
    // local copy to reduce number of global memory access
    float4 imgPtrLocal{*imgPtrGlobal};
    float2 pixel_center_norm{make_float2(inv_width * (static_cast<float>(pixel_index_x) + 0.5f),
                                         inv_height * (static_cast<float>(pixel_index_y) + 0.5f))};

    // bouding box for the whole block
    float box_l{fminf(1.f, inv_width * (static_cast<float>(blockIdx.x * blockDim.x)))};
    float box_r{fminf(1.f, inv_width * (static_cast<float>((blockIdx.x + 1) * blockDim.x) + 1.f))};
    float box_b{fminf(1.f, inv_height * (static_cast<float>(blockIdx.y * blockDim.y)))};
    float box_t{fminf(1.f, inv_height * (static_cast<float>((blockIdx.y + 1) * blockDim.y) + 1.f))};

    __shared__ uint relevant_circle_count;
    __shared__ uint circle_intersects_block[SCAN_BLOCK_DIM];
    __shared__ float circle_intersects_radius[SCAN_BLOCK_DIM];
    __shared__ float3 circle_intersects_p[SCAN_BLOCK_DIM];

    __shared__ uint prefix_sum_scratch[2 * SCAN_BLOCK_DIM]; // scratch space for sharedMemExclusiveScan
    uint *relevant_circle_indices = prefix_sum_scratch;     // use the same memory to spell out all relevant circles for render

    float3 circle_center;
    float circle_rad;
    uint circle_index;
    for (uint starting_circle_index = 0; starting_circle_index < num_circles; starting_circle_index += SCAN_BLOCK_DIM)
    {
        // Go through circles SCAN_BLOCK_DIM at a time
        // and render them on to current pixel block

        // Step 1: Go through SCAN_BLOCK_DIM circles and check whether they intersect with block
        circle_index = starting_circle_index + thread_id;
        bool last_lane_intersect{false};
        if (circle_index < num_circles)
        {
            circle_center = *(float3 *)(&cuConstRendererParams.position[3 * circle_index]);
            circle_rad = cuConstRendererParams.radius[circle_index];
            circle_intersects_block[thread_id] = circleInBoxConservative(circle_center.x, circle_center.y, circle_rad, box_l, box_r, box_t, box_b);
            if (thread_id == SCAN_BLOCK_DIM - 1)
            {
                last_lane_intersect = (circle_intersects_block[thread_id] == 1);
            }
        }
        else
        {
            circle_intersects_block[thread_id] = 0;
        }

        if (thread_id == 0)
        {
            relevant_circle_count = 0;
        }
        __syncthreads();

        // Step 2: Use exclusive scan sub routine to generate all relevant circles
        sharedMemExclusiveScan(thread_id, circle_intersects_block, circle_intersects_block, prefix_sum_scratch,
                               SCAN_BLOCK_DIM);
        __syncthreads();

        // Step 3: Collect the circle from the grid and write to relevant_circle_indices
        if (last_lane_intersect ||
            (thread_id < SCAN_BLOCK_DIM - 1 && circle_intersects_block[thread_id] != circle_intersects_block[thread_id + 1]))
        {
            // this is a relevant circle
            int circle_i = circle_intersects_block[thread_id];
            // keep track of # of relevant circle
            atomicAdd(&relevant_circle_count, 1);
            relevant_circle_indices[circle_i] = circle_index;
            circle_intersects_radius[circle_i] = circle_rad;
            circle_intersects_p[circle_i] = circle_center;
        }
        __syncthreads();

        // Step 4: Shade the pixel with circles in relevant_circle_indices sequentially
        for (int circle_i = 0; circle_i < relevant_circle_count; circle_i++)
        {
            shadePixel(relevant_circle_indices[circle_i], pixel_center_norm,
                       circle_intersects_p[circle_i], &imgPtrLocal, circle_intersects_radius[circle_i]);
        }
        __syncthreads();
    }

    // write back to global memory
    *imgPtrGlobal = imgPtrLocal;
}